

Objectives
To
gain experience in the use of additive light techniques.
To
use computers as a tool for creating art.
To
become familiar with process color printing, and understand the
differences between CMYK and RGB color via
studio
lighting, digital photography, and Adobe Photoshop.
To
gain experience in working as part of a two person collaborative
team.
Project
Overview
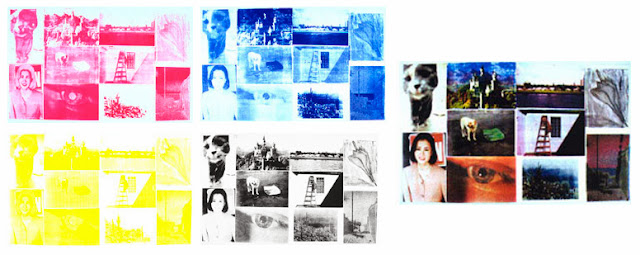
Working
collaboratively, photographs of a still life are shot and manipulated
to create a four color/ process acetate
print,
using digitally produced color separations.
Reading
and References for Study
Reading:
Chapter 5 and 6 in Becky Koenig’s Color Workbook. Pages
89-117. Review Chapter 1: Pages 4- 12.
Artcore
Website
Adobe
Photoshop help screens for halftones and color separations
Vocabulary
additive
system, RGB, computer color, HSB or HSV, optical mixtures, pixel,
bitmap, vector, subtractive system, process
colors , process materials, transparent media, actual color
transparency
Materials
3
Objects – one hard, an item of clothing (other than what you are
wearing), and a favorite object. Access
to a computer, two 8 ½ x 11” matte boards (one black and one
white), rubber cement or staples, tape
Process
Preliminary:
Before
coming to class, review the thematic concept of Collaboration as
found on the website. Also read the discussion on Additive Light
for Unit III and Media for Unit X on the Artcore website. Review the
Project References above.
Exercise:
Step
One:
Set
up a still life of you and your partner’s objects paying close
attention to good design within the composition. Be sure to include
at least a piece of your body in the composition (if you would like
your entire body in the shot go for it!). I will take a picture of
you and your composition.
Step Two:
Change
a copy of your image to CMYK color –You may continue to work with
your partner at this point, but you must each have a copy
of your recorded observations and a unique version of a print.
The
image has been scanned in RGB color for general use on a computer,
but we want to change a copy of it to CMYK color for printing the
transparencies.
1. Open Photoshop. Open your file from your disk or the shared
space.
2. Go to Select > All
3. Go to Edit > Copy
4. Go to File > New
5. In the new window go to Edit > Paste
6. If you want to alter your image in Photoshop, do it at this
point.
7. Go to Image > Mode > CMYK color – when it asks if
you want to flatten the image, do it.
Note the slight change in color -go back and forth between modes to see the change again. Not all colors possible with RGB are reproducible with CMYK, and vice versa.
Note the slight change in color -go back and forth between modes to see the change again. Not all colors possible with RGB are reproducible with CMYK, and vice versa.
8. Record your observations on the differences the change in
color mode makes.

Step Three:
Look
at the color separations.
In
Photoshop, it is possible to look at the separations before we print
them. Follow these steps and record your answers for the CMYK
copy of your photograph only.
1. Select Window > Channels
A new window titled Channels should now appear to the
right of your screen.
2. Clicking the name of the channel will make a channel visible
or invisible. Click on the names of the different channels
(Cyan, Magenta, etc) to see what they look like in
black and white. What happens when only one color channel
and black are selected? (Select multiple channels by
holding down the SHIFT key while you click) What happens when
different combinations of color channels are selected?
Play around and try different combinations.
3. Record your observations.
Step Four:
 Create
Halftones
Create
HalftonesIn order to print the image with a silkscreen or other printing process the image must have a halftone or other graphic code on separated channels.
1. For great halftone effects you must first make sure your image
is at a high resolution.
a)
Go to Image > Image Size…
b)
Set the Resolution to 180 pixels/inch or higher.
2. Copy each channel (Cyan, Magenta, Yellow paired with (K)
Black) into a new window.
a)
In the Channels window select a channel (C, M, or Y) by
clicking on the channel name (the channel must be visible –
have the eye icon next to it).
b)
After selecting the channel hold the Shift key and select the
channel for black. You should now have 2 channels selected.
c)
Go to Select > All
d)
Go to Edit > Copy
e)
Go to File > New
f)
In the new window Go to Edit > Paste
3. You should now have a copy of your image with only one colored
layer and a black layer.
4. Delete the content of the black channel by clicking the name
of the channel.
a)
Go to Select > All and then press the Delete Key on your
keyboard.
b)
You should now have a copy of your image with only one channel
visible.
5. Go to Filter > Pixelate > Color Halftone
a)
The appropriate channel must be selected in the Channels Window.
b)
Be sure to play around with the settings to get different effects.
6. Repeat the above steps for each channel (C,M,Y, and K).
7. Print each half toned channel (C, M, Y, and K) separately onto
transparency film. I recommend getting your
transparencies printed at a local copy store. They will already have
the transparencies on hand so there is no need for you to
purchase any.
I
suggest that you copy and paste each image into a single Word file.
Play
with the size, making sure all your images are the same size, but
make sure that you leave enough room for your matte frame. You
probably don’t want the edges of your image to be cut off by
your frame.
Step Five:
Combine
the Prints
1. Use rubber cement sparingly (clear tape, or staples) around
the top edges between transparencies to join them into
a single image. Play around with the order of your transparencies for
the best result.
2. Adhere to the center of a clean, white matte board.
3. Cut the center out of your black matte board to make a frame.
4. Tape the edges together on the inside of your matte board.
Critique
Ideas
Points
to discuss might involve the following:
1.
What are the conceptual reasons behind creating multiples?
2.
What differences are there between smaller and larger images?
3.
Did everyone use the same shape of halftone (and how does that affect
the final image)?
4.
What type of images work well for this technique (drawings,
photographs, level of detail, original color/s)?
5.
Is the color/ reproduction accurate; were images registered
correctly; were the color/ separations in the right order,
etc?
Notebook
Checklist
□ Clean and Organized
□ Turned in on Time
□ Clean and Organized
□ Turned in on Time
□ Project
Objectives Page
□ Discussion
Page on Additive Color, Process Color and Media
□ Concept
Page on Collaboration
□ Vocabulary
□ Research
□ CMYK
Print
□ Recorded
Observations
No comments:
Post a Comment